Building the Linux kernel from scratch is very easy: you only need the source code (git clone git://git.kernel.org/pub/scm/linux/kernel/git/torvalds/linux.git), a few tools to be able to compile it (the list of minimal requirements is here), and simple commands like make defconfig && make.
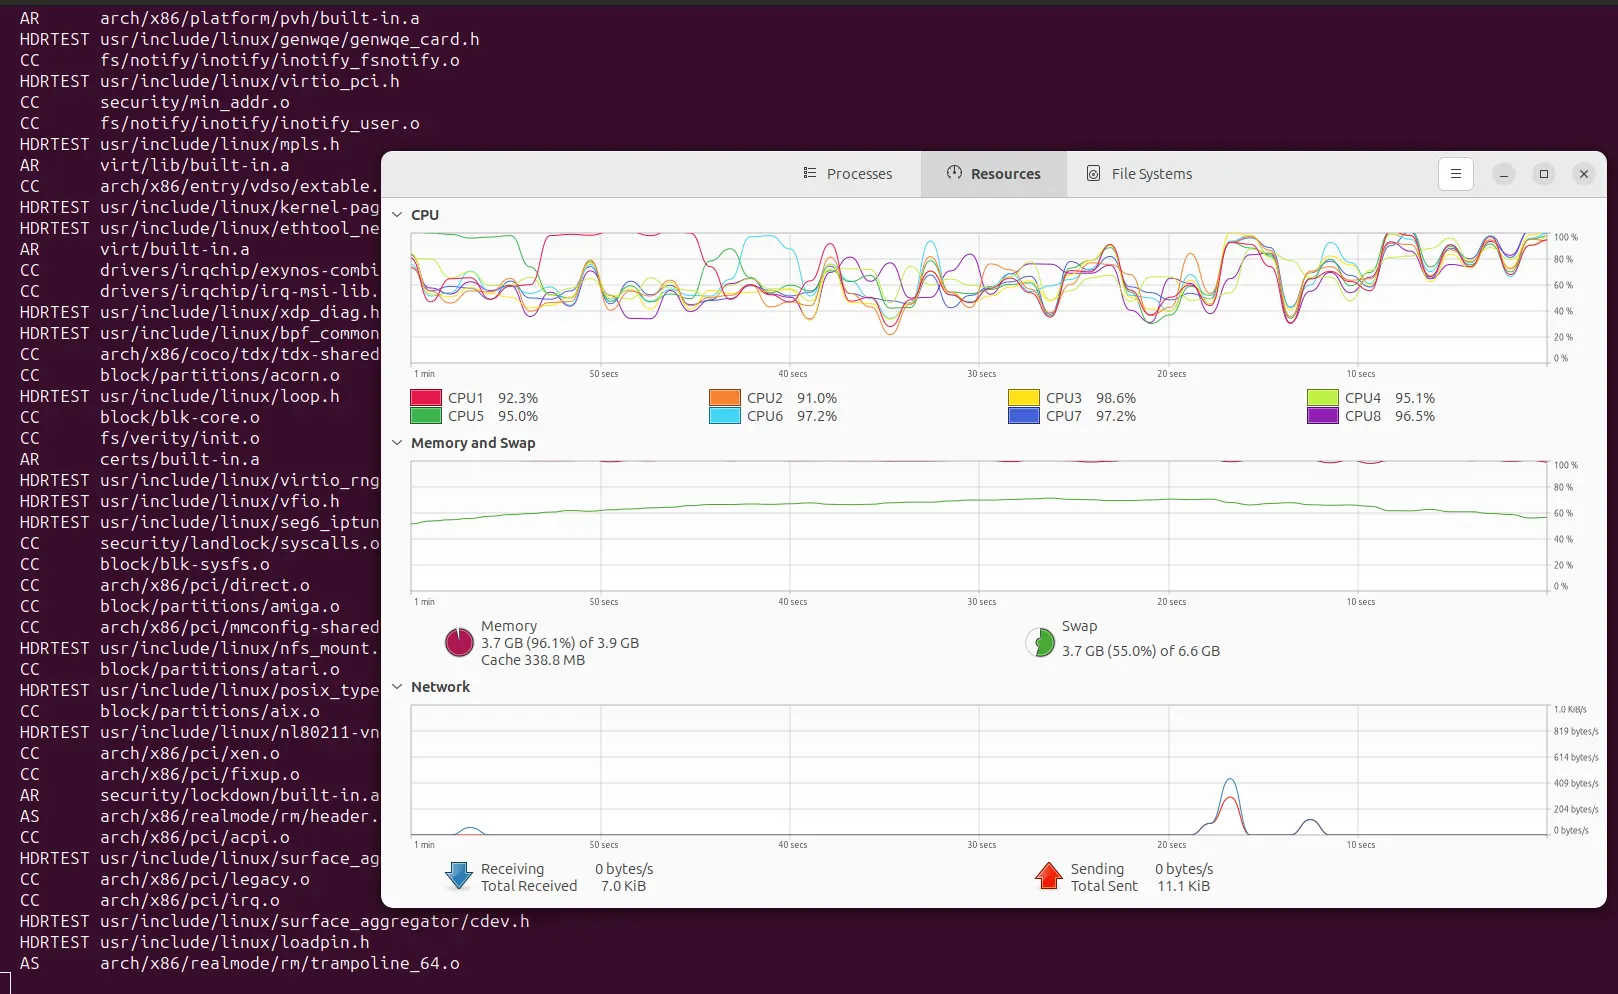
That should be enough to generate a new kernel image, and many developers never go beyond that: make clean no matter what has been changed, and maybe make -j4 (for some reason, probably a copy+paste, it is always 4 ![]() ) to speed things up. That’s alright, but compiling the kernel takes time, and it exhausts machine resources quickly.
) to speed things up. That’s alright, but compiling the kernel takes time, and it exhausts machine resources quickly.
In this article, I discuss some basic notions every kernel developer should have as well as a few tricks/tools to compile the kernel faster, and potentially with a not-so-powerful machine.
Content:
- 1. Basics from the basics: use make properly
- 2. The obvious tip: only include what your kernel needs
- 3. GCC vs Clang: the compiler matters
- 4. ccache: recycle previous builds to compile faster
- 5. zram: you don’t need infinite RAM to build the kernel
- 6. distcc: build on multiple machines in parallel
1. Basics from the basics: use make properly
First things first: the Makefile in the root directory contains a help section, and make help is the first command you should use. There is no need to google the different configurations, how to compile with LLVM, or how to build the documentation. Everything is there, including what make clean, make mrproper, and make distclean mean:
$ make help
Cleaning targets:
  clean		  - Remove most generated files but keep the config and
                    enough build support to build external modules
  mrproper	  - Remove all generated files + config + various backup files
  distclean	  - mrproper + remove editor backup and patch files
You will seldom need mrproper and distclean, and if you are only working on a couple of modules, you don’t want to Remove most generated files either. Actually, make carries out incremental compilations, and if you only modified one file, only that file and the ones that depend on it will be compiled again if you call make without cleaning anything. If for whatever reason you want to clean/build a specific subsystem (more precisely, a folder where a Makefile resides), simply use the M= argument: make M=drivers/iio/humidity/ [clean].
About the ubiquitous -j4: that is telling the compiler to spawn 4 threads to run tasks in parallel. But why 4 and not 40 or 4000? That will depend on your machine and the current workload. If the workload is low (you are about to compile the Linux kernel, maybe not the best moment to overload your machine…), you usually want to have at least as many threads as cores your machine has, possible a few more to optimize workloads. In a nutshell, the nproc (number of processors) environment variable is usually passed instead of a hard-coded number, so you don’t have to edit your command depending on the machine you are using. Common values are -j$(nproc) and -j$((2 * $(nproc))). Simply try what works better for you, but don’t go for something like -j$((1000 * $(nproc))) because that will generate too much context switching (we will see later how the RAM consumption skyrockets), no gains at all, and the compilation will probably crash. For example, my machine compiles much faster with -j$(nproc) than with -j$((2 * $(nproc))), and I have to type less characters ![]()
2. The obvious tip: only include what your kernel needs
Another thing that beginners inherit from 1-minute tutorials: always use make defconfig or even make allyesconfig. If you read the previous section, you should have already tried make help, which lists all possible configuration targets:
$ make help
# [...]
Configuration targets:
  config          - Update current config utilising a line-oriented program
  nconfig         - Update current config utilising a ncurses menu based program
  menuconfig      - Update current config utilising a menu based program
  xconfig         - Update current config utilising a Qt based front-end
  gconfig         - Update current config utilising a GTK+ based front-end
  oldconfig       - Update current config utilising a provided .config as base
  localmodconfig  - Update current config disabling modules not loaded
                    except those preserved by LMC_KEEP environment variable
  localyesconfig  - Update current config converting local mods to core
                    except those preserved by LMC_KEEP environment variable
  defconfig	      - New config with default from ARCH supplied defconfig
  savedefconfig   - Save current config as ./defconfig (minimal config)
  allnoconfig	  - New config where all options are answered with no
  allyesconfig	  - New config where all options are accepted with yes
  allmodconfig	  - New config selecting modules when possible
  alldefconfig    - New config with all symbols set to default
  randconfig	  - New config with random answer to all options
  yes2modconfig	  - Change answers from yes to mod if possible
  mod2yesconfig	  - Change answers from mod to yes if possible
  mod2noconfig	  - Change answers from mod to no if possible
  listnewconfig   - List new options
  helpnewconfig   - List new options and help text
  olddefconfig	  - Same as oldconfig but sets new symbols to their
                    default value without prompting
  tinyconfig	  - Configure the tiniest possible kernel
  testconfig	  - Run Kconfig unit tests (requires python3 and pytest)
One of them is indeed defconfig, and often it’s what you want to use if you don’t care much about the kernel configuration you are going to use (e.g. when writing a tutorial like this one, or the first time you build the kernel, and you don’t really know what you are doing). But defconfig will enable a bunch of features that you might not need for your quick test (e.g. running a minimal kernel on Qemu, like virtme-ng does… stuff for another article) or on your target machine (e.g. an embedded device). More features means more to compile, and more memory to store the resulting image.
Let’s see a simple example. First, I will build the mainline kernel fox x86_64 defconfig, and then tinyconfig, both with LLVM/Clang 18.1.8 (we will talk about GCC vs Clang later):
$ make defconfig
$ time make -j$(nproc)
real	4m43.643s
$ ls -lh arch/x86/boot/bzImage | awk '{print $5}'
13M

$ make tinyconfig
$ time make -j$(nproc)
real	0m31.355s
$ ls -lh arch/x86/boot/bzImage | awk '{print $5}'
581K
The tinyconfig build was ~9 times faster, and the image is ~22 times smaller. That shows how much room there is in between to build a tailored kernel. And if you are asking yourself “why so much trouble for 3 minutes?”, the results could have been much more extreme. Let’s see how long it takes to compile with allyesconfig:
$ make allyesconfig
$ time make -j$(nproc)
real	60m39.751s
Fine-tuning a kernel configuration is not trivial, and it usually takes a lot of time. But playing around with different configuration targets and then adding a couple of features you would like to try is not, and that will show you the basics to build upon. Bottom line: pay attention to your kernel configuration!
3. GCC vs Clang: the compiler matters
I have talked several times about why I find Clang (actually, the LLVM toolchain) a very interesting option to compile the Linux kernel: better diagnostics (in my experience, it tends to catch more bugs), and more sanitizers (e.g. you still need Clang >= 14 to use KMSAN). If you want to try the whole LLVM toolchain, you only have to pass LLVM=1 (either to make or as an environment variable), and if you only want to use the Clang, use the CC argument as follows: CC=clang. Easy-peasy!
On the other hand, I must say that on my machine, with the versions I installed, and the configurations I tested, GCC compiles a bit faster. Again, let’s give defconfig and allyesconfig a chance:
$ gcc --version
gcc (Ubuntu 13.2.0-23ubuntu4) 13.2.0

$ make defconfig
$ time make -j$(nproc)
real	3m24.128s

$ make allyesconfig
$ time make -j$(nproc)
real	47m23.330s
Does results are much better than the ones I got in the previous section with LLVM/Clang. Does that mean that GCC is always faster? Not really. Actually, I have read multiple times that LLVM/Clang is often faster, so I suppose that there are many cases where it is. I am just saying that trying both is very easy, and in your particular case choosing one compiler over the other might make a big difference. Just give both a shot!
4. ccache: recycle previous builds to compile faster
Ccache is a C/C++ compiler cache that significantly speeds up the recompilation process. What it does is simple, yet clever: it stores the results of previous compilations and reuses as much as possible when similar compilations are requested again. By avoiding unnecessary recompilations, ccache can dramatically reduce build times, especially in large projects with many source files. A large project in C with many source files? The Linux kernel sounds like a perfect fit!
You simply have to install ccache, and pass it to the make command. How? A simple way (the one I use) is via the CC argument I mentioned before to specify the compiler, like CC="ccache gcc" or CC="ccache clang. This time I will build the same allyesconfig kernel a few times with LLVM/Clang to compare the results.
By the way, the official documentation to build Linux with LLVM mentions ccache and the need to set KBUILD_BUILD_TIMESTAMP to '' (actually, to a deterministic value) in order to avoid 100% cache misses, so I will follow suit here.
A normal compilation without ccache took ~60 minutes, as we saw in previous sections. Let’s clean and compile again, this time with ccache. I will make sure that there is nothing cached from previous compilations with ccache -C, and I will also zero the statistics with the -z argument (the -s argument will show the ccache statistics: size, hits, and misses):
$ ccache -Cz
Clearing... 100.0% [==============================================]
Statistics zeroed
$ ccache -s
Local storage:
  Cache size (GiB): 0.0 / 5.0 ( 0.00%)
$ make clean
$ time KBUILD_BUILD_TIMESTAMP='' make CC="ccache clang" -j$(nproc)
real	78m9.046s
Even worse! Well, that makes sense because nothing was cached, and the cacheable calls had to be stored. The real gain comes when you clean and build again:
$ make clean
$ time KBUILD_BUILD_TIMESTAMP='' make CC="ccache clang" -j$(nproc)
real	9m52.276s
$ ccache -s
Cacheable calls:    25679 / 30365 (84.57%)
  Hits:             25601 / 25679 (99.70%)
    Direct:         25595 / 25601 (99.98%)
    Preprocessed:       6 / 25601 ( 0.02%)
  Misses:              78 / 25679 ( 0.30%)
Uncacheable calls:   4686 / 30365 (15.43%)
Local storage:
  Cache size (GiB):   1.2 /   5.0 (24.55%)
  Hits:             25601 / 25679 (99.70%)
  Misses:              78 / 25679 ( 0.30%)
That looks much better. In this case nothing changed between the last two compilations, and almost all calls turned into cache hits.
In principle, you will modify multiple files before building again, and the hit rate will decrease. Hence why ccache is especially powerful if you usually work with the same kernel version, and only modify a few files every time (e.g. if you work with a stable kernel, or a given kernel version).
Let’s see what happens when I pull the changes made in a single day (some relatively quiet day between v6.11-rc4 and v6.11-rc5) in the master branch of the mainline kernel:
$ git pull
Updating 86987d84b968..928f79a188aa
Fast-forward
 MAINTAINERS                                    |  2 +-
 arch/loongarch/include/asm/dma-direct.h        | 11 -----------
 arch/loongarch/include/asm/hw_irq.h            |  2 ++
 arch/loongarch/include/asm/kvm_vcpu.h          |  1 -
 arch/loongarch/kernel/fpu.S                    |  4 ++++
 arch/loongarch/kernel/irq.c                    |  3 ---
 arch/loongarch/kvm/switch.S                    |  4 ++++
 arch/loongarch/kvm/timer.c                     |  7 -------
 arch/loongarch/kvm/vcpu.c                      |  2 +-
 drivers/platform/x86/amd/pmc/pmc.c             |  3 +++
 drivers/platform/x86/asus-nb-wmi.c             | 20 +++++++++++++++++++-
 drivers/platform/x86/asus-wmi.h                |  1 +
 drivers/platform/x86/x86-android-tablets/dmi.c |  1 -
 fs/attr.c                                      | 14 +++++++++++---
 fs/btrfs/bio.c                                 | 26 ++++++++++++++++++--------
 fs/btrfs/fiemap.c                              |  2 +-
 fs/btrfs/qgroup.c                              |  2 ++
 fs/btrfs/space-info.c                          | 17 +++++------------
 fs/btrfs/space-info.h                          |  2 +-
 fs/nfsd/nfs4state.c                            | 51 +++++++++++++++++++++++++++++++++------------------
 fs/nfsd/nfs4xdr.c                              |  6 ++++--
 fs/nfsd/state.h                                |  2 +-
 include/linux/fs.h                             |  1 +
 23 files changed, 112 insertions(+), 72 deletions(-)
 delete mode 100644 arch/loongarch/include/asm/dma-direct.h
Not many modifications, but we are using allyesconfig, and some of them like include/linux/fs.h will affect many files. Let’s see what happens then:
$ make clean
$ time KBUILD_BUILD_TIMESTAMP='' make CC="ccache clang" -j$(nproc)
real	76m51.382s
Once again, slower than without ccache, and only slightly faster than with an empty cache. There were not many cache hits, and even though a second compilation got back to very high cache hits, ccache might not be the best option if you always work with the latest mainline kernel.
As I said, if you only work on modules that are not required by many other elements of the kernel, ccache is indeed interesting. For example, I edited two of my device drivers (drivers/iio/humidity/hdc3020.c and drivers/hwmon/chipcap2.c, nothing depends on them), and the results are much better:
$ make clean
$ time KBUILD_BUILD_TIMESTAMP='' make CC="ccache clang" -j$(nproc)
real	9m53.534s
$ ccache -s
Cacheable calls:    25679 / 30365 (84.57%)
  Hits:             25599 / 25679 (99.69%)
    Direct:         25599 / 25599 (100.0%)
    Preprocessed:       0 / 25599 ( 0.00%)
  Misses:              80 / 25679 ( 0.31%)
Uncacheable calls:   4686 / 30365 (15.43%)
Local storage:
  Cache size (GiB):   1.8 /   5.0 (35.58%)
  Hits:             25599 / 25679 (99.69%)
  Misses:              80 / 25679 ( 0.31%)
Only two misses more than if you recompile without changing anything, which makes sense. I would recommend you to try ccache within your usual workflow to check if it makes sense for you or not, because if it does, you really will save much time.
Note that the cache size will increase with new cacheable calls, and at some point you might want to either clean the cache as we did above, increase the size (-M [SIZE]), or carry out any other operation supported by ccache. Anyway, ccache --help is your friend.
If you really want to squeeze ccache to get the most of it, take a look at its very complete documentation here. I am nothing more than a casual user whenever I work on a specific kernel version for several weeks. Maybe you will find some tricks I don’t know, and I will be pleased to update this tutorial and my own workflow. I doubt that this will happen, even if someone finds better tricks after reading this article… yet I still have a little bit of faith in humanity ![]()
5. zram: you don’t need infinite RAM to build the kernel
I did not know this trick until a mentee from the LKMP had issues to compile a “fat” kernel on a machine with limited resources i.e. RAM, and the compilation would crash every time. Fortunately, I never faced that issue myself, but if I had, I would have probably tried to increase the size of the swap memory, which would have been a partition of some slow memory (HDD/SSD). But that mentee had tried that as well, and the compilation would crash anyway. In the end, the hard disk is by no means as fast as the RAM, and if the lack of memory is severe enough, that workaround might fail.
Good news, old and not-so-powerful machines can profit from zram to make the most of their RAM. In a nutshell, zram is a kernel module (you will find it under drivers/block/zram) that gives you some breathing room by creating a compressed block device in your RAM. Essentially, it lets you use part of your RAM as compressed storage, which can be a lifesaver when you’re pushing your system’s memory limits. Instead of upgrading your hardware or dealing with sluggish performance, zram allows you to squeeze more out of the RAM you already have.
So how does this magic work? When you set up zram, it creates a virtual device in your memory where data is compressed before it’s stored. This means you can store more in the same amount of RAM, and your system stays more responsive, even when you’re doing something as demanding as building the Linux kernel. The canonical approach would be loading the zram module (which some distros seem to provide by default, some others will require you to install a package like sudo apt install linux-modules-extra-$(uname -r)), configuring it via sysfs attributes, and activating it. The official kernel documentation walks through those steps in detail, so there is no need to plagiarize here.
There is indeed a friendlier approach thanks to zram-tools, at least for Debian-based distros. Not that loading a module should be a problem (because you DO know how to load/unload kernel modules, don’t you??), but this package slightly simplifies the configuration process.
Actually, there is even a second package called zram-config that in the end seems to do more or less the same. I installed both, and zram-tools provides a nice systemd service (zramswap), and a man page too. I have been using zram-tools for a couple of days, and I am not missing any feature. Its documentation is not very extensive, but fair enough, so I will stick to it. I will not cover other use cases like mounting zram as a /tmp or /var storage, and for us, it will only be fast, extra swap memory.
As I am experimenting with zram, stressing tools, and compression algorithms at the moment, this section might get updated in the future with my typical, not-so-reliable measurements. But to get some taste of what you can expect from zram, I have tested it on a virtual machine with ~4G of RAM and 8 CPUs by compiling the kernel with -j$((10 * $(nproc))). As I said before, spawning so many threads consumes too much RAM, and the compilation will crash without zram, or even with a small amount of RAM assigned to zram.
Let’s try first with the default value of 10%. As you can see, the total size of the swap memory is now slightly bigger (~400M thanks to that new device /dev/zram0):
$ free -h
               total        used        free      shared  buff/cache   available
Mem:           3.6Gi       1.0Gi       2.1Gi        41Mi       798Mi       2.6Gi
Swap:          4.4Gi          0B       4.4Gi

$ swapon
NAME       TYPE        SIZE USED PRIO
/swap.img  file          4G   0B   -2
/dev/zram0 partition 371.3M   0B  100

# you can also use zramctl without arguments to list your zram devices:
$ zramctl
NAME       ALGORITHM DISKSIZE DATA COMPR TOTAL STREAMS MOUNTPOINT
/dev/zram0 zstd        371.3M   4K   59B   20K       8 [SWAP]

Now I will try again, but using the example from Debian to give zram 60% of the total RAM and use the zstd compression algorithm:
$ echo -e "ALGO=zstd\nPERCENT=60" | sudo tee -a /etc/default/zramswap
ALGO=zstd
PERCENT=60
$ sudo service zramswap reload

$ free -h
               total        used        free      shared  buff/cache   available
Mem:           3.6Gi       1.1Gi       2.0Gi        42Mi       800Mi       2.6Gi
Swap:          6.2Gi          0B       6.2Gi

$ zramctl /dev/zram0
NAME       ALGORITHM DISKSIZE DATA COMPR TOTAL STREAMS MOUNTPOINT
/dev/zram0 zstd          2.2G   4K   59B   20K       8 [SWAP]
Now that the swap memory increased, and a big chunk (2.2G) is actually RAM memory, things look different:
Of course, zram is no panacea for all cases, and it has some downsides: less RAM without the overhead of the compression/decompression operations, and according to the documentation, about 0.1% of the size of the disk gets eaten by zram even when not in use. The expected compression ratio is 2:1, so even in the most extreme case, you won’t be able to go further than that. In short, if you have no memory issues, you would be better off without zram.
Although I don’t have memory issues at the moment, I am very interested in this feature and how far I can get with it, because I will need it for a “project” where I will only have access to a low-power machine to compile the kernel, at least for a year. More about it soon…
6. distcc: build on multiple machines in parallel
So, you’ve just read about zram and how it helps when your system’s low on resources. What if you do have loads of resources, but scattered across multiple machines that are being underutilized at the moment? Would it not be great if they could work together and boost your kernel compilation? Well, that’s exactly what distcc achieves.
Distcc is a tool that, according to its official site, distributes the compilation of a project across several machines in a network, splitting the workload. Apparently, you don’t even need to run the same OS on the machines you are going to use, but given that my use case is pretty clear (compiling the Linux kernel on a Linux-based OS), I am going to show you an example with two machines that run the same OS (Ubuntu 24.04.1 LTS), and the same versions of all the tools that are required to build the kernel (compiler, linker, etc.).
distcc supports both GCC and Clang as its back-ends (it seems that GCC is the main focus), which is great for kernel hackers. For this example, I am going to use the same version of GCC as before (13.2.0), and distcc 3.4 (the version I got installed via apt) on the two machines. localhost will be the machine where the build process will be triggered or client, and sloth will be the server that will receive requests to process (i.e. compile) from localhost.
Note that sloth is much less powerful than localhost (1/2 RAM, 1/2 CPUs, and slower), and there will be performance losses anyway due to network traffic (the best real performance with two identical machines seems to be ~1.89). Nevertheless, there should be some gains compared to a single machine. I am going to compile allyesconfig again to have some more work for the two machines.
First, and without pretending to write a tutorial about distcc, a very simple configuration that you can escalate for N servers:
-
(One-time step) Set static IP addresses: not mandatory, but nice to have if you don’t want to remember and write IP addresses every time. Simply give fixed IP addresses to your machine(s) (e.g. access to your router, typically 192.168.0.1 or 192.168.1.1, look for DHCP settings, and choose IP addresses by providing the MAC address of the interface, which you can get with the
ip addrcommand). - (One-time step) Use the static addresses to provide names to the servers and add them to
/etc/hostslike this:$ cat /etc/hosts 127.0.0.1 localhost 192.168.0.15 sloth -
From the man page: “On each of the servers, run distccd –daemon with –allow options to restrict access”. You can simply run
distccd --daemonand the default will work for a local network. I only have one server, so I will run that command on sloth. -
Adapted from the man page: Put the names of the servers in your environment:
export DISTCC_HOSTS='localhost sloth' - Build. In this case I know that I have ~40 CPUs in total, so let’s keep it simple:
make -j40 CC=distcc
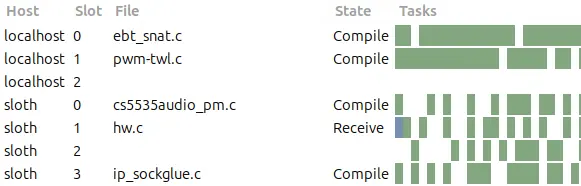
After a couple of seconds, the network traffic to sloth increases drastically, and the CPU load will rise as well. If you want to know what’s going on behind the scenes, you can install distccmon-gnome to get a minimalistic UI. It is so minimalistic, that you only have to open it, and it will automatically start showing you what distcc is doing:
$ make allyesconfig
$ export DISTCC_HOSTS='localhost sloth'
$ time make -j40 CC=distcc
real	40m46.212s
In my particular case, which is probably not the most optimal one (only one server, Wi-Fi connections, and not particularly fast), the compilation time of allyesconfig dropped from ~47 minutes to ~41 minutes, which is good… although not enough for me to set it up every time I want to build a “fat” kernel. But users with multiple servers and a fast connection will probably love distcc.
If you are planning to use distcc on a regular basis, and potentially over a large number of servers, I would recommend you to read its man page carefully. You will find valuable information about the -j option we discussed before. Another interesting option might be the pump mode via distcc-pump, which will make distcc send the included header files as well to allow for on-sever preprocessing. According to the man page, by using the pump mode, the compilation could be an order of magnitude faster. I gave it a quick try to see what happens, and it did not even work on my machines with the version I have. But I did not invest any time on it, so maybe you will make it work. If you do, please let me know how.
And now it’s your turn to tell me your best tricks to build the Linux kernel quickly, and efficiently. This article is already very long, but I will be pleased to add another section. Whatever it takes for the community!
Enjoy and share knowledge!