I2C is a very simple communication protocol, yet widely used in embedded systems. There are literally thousands of different devices that use (at least) I2C to deliver information to any controller that supports that protocol.
Good news: Linux supports I2C, and hundreds of the drivers in the kernel use I2C as their main/only communication protocol. Moreover, there are several tools available to manage such devices from userspace, which also helps in the first stages of the driver development process. Furthermore, you can use those tools to simulate real hardware.
In this article, I will show you how to work with I2C on Linux, both with virtual and real hardware.
Rewriting the specs is boring… and reading them too
There is definitely no need for another tutorial about how I2C works: start and stop conditions, protocol speeds…nah. This is a hands-on article, and you only need to know this:
There are two I2C lines to connect: a clock, and the data. These lines need pull-up resistors, but many SoCs, like the Raspberry Pi, include them in their design, and you only have to make sure that you connect “clock” to “clock”, and “data” to “data”. Do you have a tricky SoC? Check if the pull-up resistors are included. If not, connect a 4.7K resistor from each I2C line to the power supply.
Connect the power supply: obvious, but in case you know nothing about hardware… if your device is a simple one, it will only require one power supply (3V3 and 5V can be obtained from the Raspberry Pi directly), and ground. Again, another daunting task: connect “GND” to “GND”, and “3V3” to “3V3” or the equivalent for the voltage level your device requires.
The I2C device has (usually) a unique address: we will use that address to know where to find the device and communicate with it.
The communication will be half-duplex: you access the device to read or write, and wait for a reply. Then you access the device again, and wait for a reply again. That’s basically it. Your SoC act as the master, and the I2C device as a slave i.e. your SoC is the f* boss and tells I2C devices when to talk.
Enough theory: let’s get down to business
Alright, let’s see what we can do with Linux and a real/virtual I2C device.
SoC: for simplicity and coherence with my previous article, I am going to use Raspberry Pi Zero 2 W. Any other Raspberry Pi can be used instead, though, and everything will look more or less the same.
I2C support in the kernel. Make sure that CONFIG_I2C is selected in your .config. If you followed my previous article, it should be selected already.
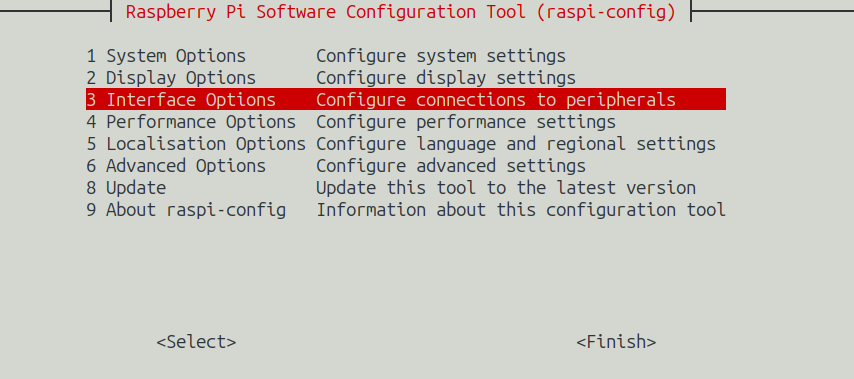
Enabled I2C support for your Raspberry Pi. This has (once again) something to do with the device tree, which I will cover in another article, because otherwise this one will never end For now, you just want your Raspberry Pi to “enable” I2C. You can do it easily with raspi-config, and even more easily in your config.txt:
a. Editing config.txt: uncomment dtparam=i2c_arm=on, which is actually what the comment above that line is telling you to do.
b. Using raspi-config: call sudo raspi-config on your Raspberry Pi and select Interface Options:
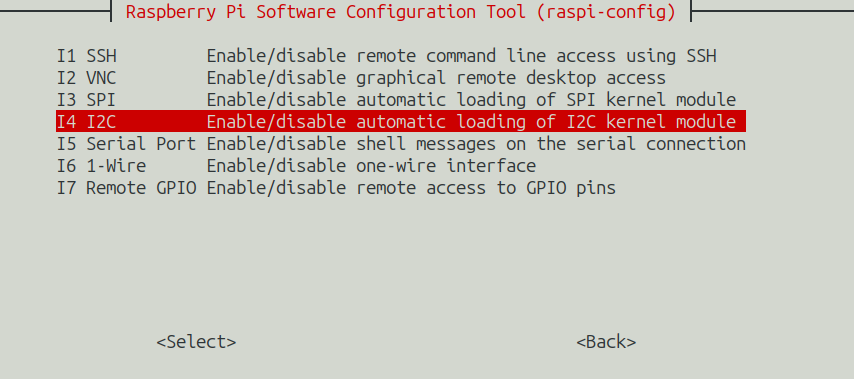
Now select I4 I2C and enable. End of the story.
i2c-tools package: sudo apt install i2c-tools or the equivalent for your distro. That will install some nice tools to manage I2C devices.
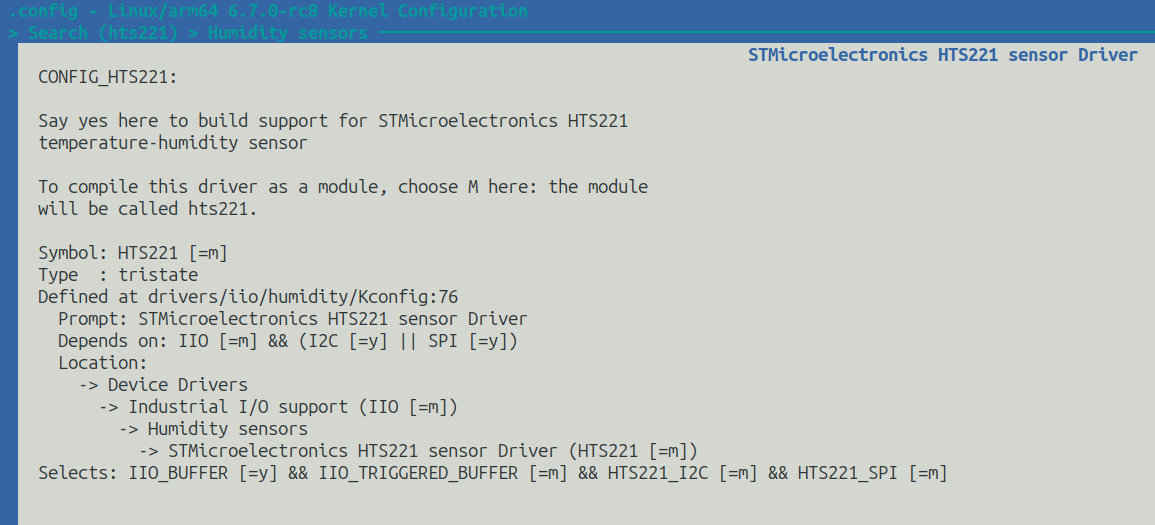
(Optional) Simple I2C device. I have connected a humidity sensor called hts221, supported by the kernel under the IIO subsystem. Any other simple I2C device will work similarly. Just make sure that you select the device driver either with menuconfig or directly in the .config file. The latter is faster, but the former automatically selects dependencies. If you are cross-compiling, make sure that you call menuconfig like this:
make ARCH=arm64 CROSS_COMPILE=aarch64-linux-gnu- menuconfig
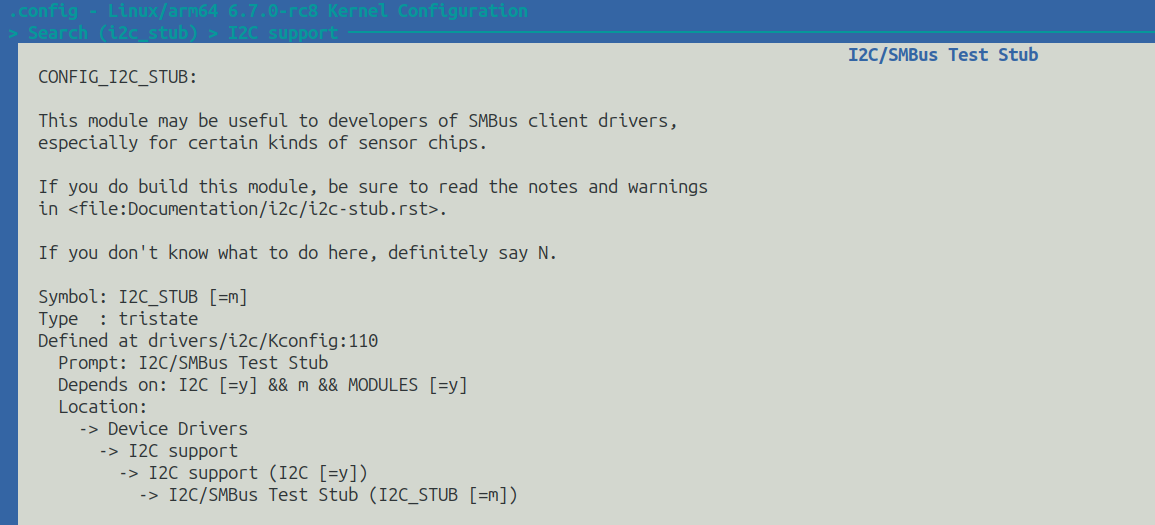
(Optional) I2c/SMBus Test Stub support in the kernel. You will need that for the examples with virtual devices. Select it with menuconfig under I2C support, or simply open .config, search for CONFIG_I2C_STUB, and modify the line to have this: CONFIG_I2C_STUB=m (with no # at the beginning…).
If you don't know what to do here, say [M]aybe
2. Example with a real I2C device
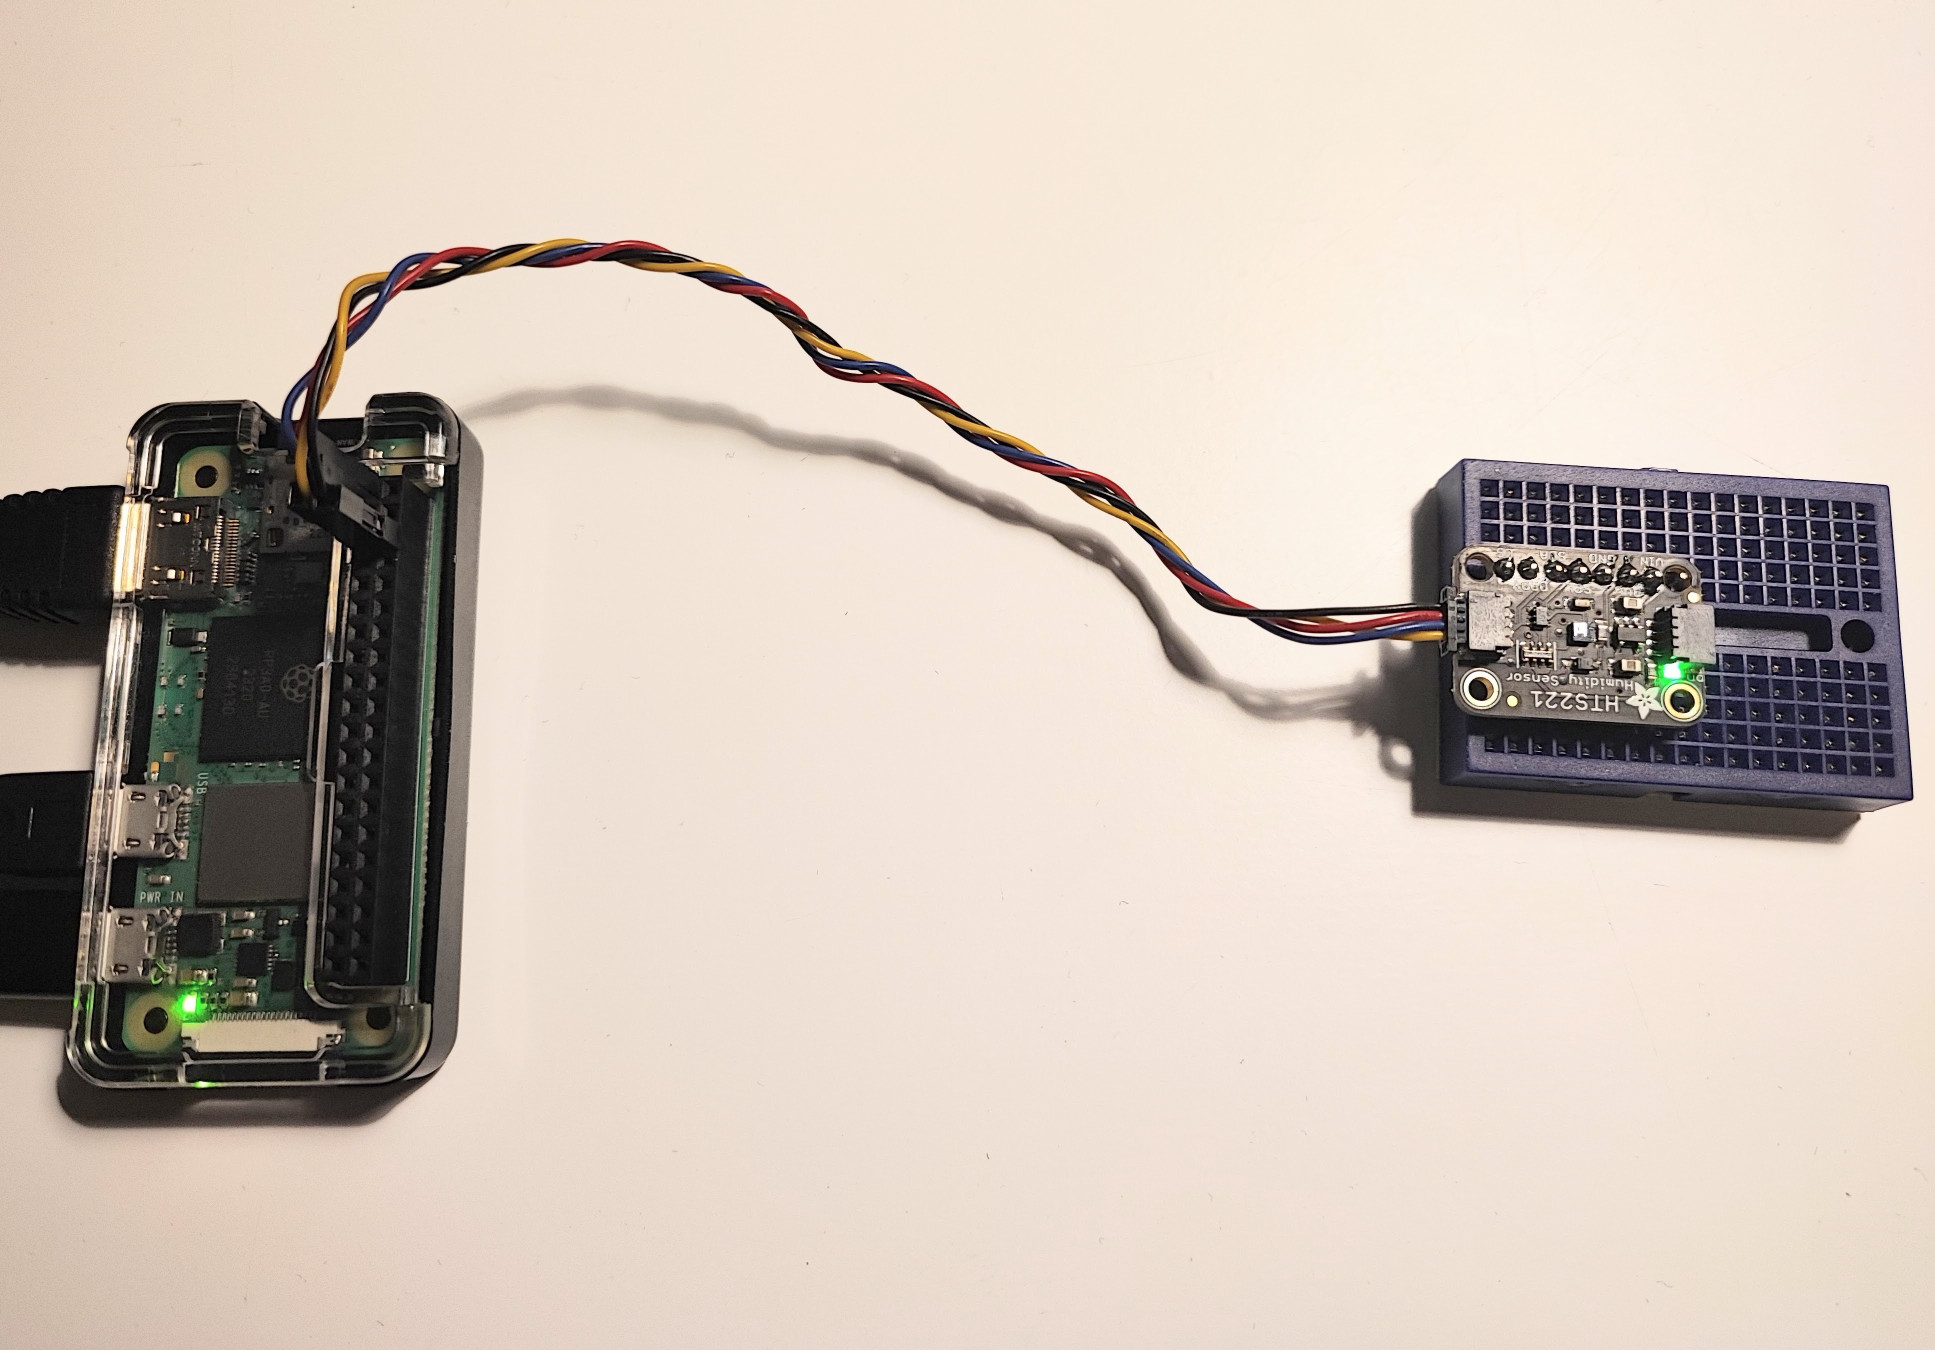
If you have a simple device that only requires I2C and one power supply, your setup will look like as simple as this:
This is all you need to program a device driver. Sometimes even less!
The first thing we are going to do after powering our Raspberry Pi is checking if we have an I2C bus on the system with i2cdetect -l:
Why are there two I2C buses? Well… why not? I never said you can only have one. Actually, some SoCs have 3 or more I2C buses. But don’t panic just yet, i2c-2 is used internally for HDMI and only i2c-1 is accessible from the GPIOs.
Alright, let’s see if we have some I2C device connected to our SoC, again with i2cdetect. Note the -y argument to confirm that we want to do that and get rid of unnecessary warnings .
That is a beautiful table, isn’t it? The important thing is that we see something at the address 0x5f. Is that the hts221? Hmm, I did not connect any other device, the hts221 uses the I2C address 0x5f… I am going to risk again and assume it is. I am also going to assume that -- means no device with that address is connected. And the addresses with no symbols? Good catch, they are out of the valid range for I2C devices according to the I2C specification and therefore they are not relevant for us.
Imagine for a moment that there is no driver for this device, and we only want to make sure that we can read values from it. Could we do that from userspace? Sure! According to the datasheet, the internal address 0x0f corresponds to the WHO_AM_I read-only register, that always returns 0xbc. We can use i2cget for that:
i2cget-y10x5f0x0f0xbc
What a success story! Could we write data to registers as well? Definitely. The 0x10 internal address corresponds to the AV_CONF (resolution mode). Let’s select internal averages of 256 for temperature and 512 for humidity (0x3f):
Another tool included in i2c-tools is i2cdump, which will show us the values of all registers from 0x00 to 0xff, or in a defined range. The hts221 provides registers in the address range 0x00-0x3f, so there is no need to scan further:
i2cdump-r0x00-0x3f-y10x5fb0123456789abcdef0123456789abcdef00:00 00 00 00 00 00 00 00 00 00 00 00 00 00 00 bc ...............?10:3f 00 76 32 97 be 62 a2 9e b2 fc 00 d0 01 80 9a ?.v2??b????.????20:00 00 00 00 00 00 00 00 c3 d6 31 00 5b d7 61 00 ........??1.[?a.30:3b 89 a7 14 00 c4 f4 ff 99 03 be cd fd ff ea 02 ;???.??.?????.??
Ok, I will be honest: I am trying to hide some complexity here. If you dump 0x80-0xbf, you will read the same values… and actually the driver works with the 0x80-0xbf range. Why is that? Because for this device, every internal address consists of 7 bits (6..0) for the register address plus the MSB (Most Significant Bit, here bit 7), which is used for something called auto-increment. The auto-increment is used to automatically increase the address pointer for multiple data read and write operations, which is not relevant for these examples. Therefore, 0x80 (0b10000000) means address 0x00 with auto-increment, and 0x00 means address 0x00 without auto-increment. By the way, the auto-increment feature is not part of the I2C standard and not all devices support it. Anyway, the device driver always uses addresses with the auto-increment enabled, and given that we are going to load the driver later on, we will use the 0x80-0xbf range to write values to registers. This is a good example of why you should always read the datasheet first.
i2cdump-r0x80-0xbf-y10x5fb0123456789abcdef0123456789abcdef80:00 00 00 00 00 00 00 00 00 00 00 00 00 00 00 bc ...............?90:3f 00 76 32 97 be 62 a2 9e b2 fc 00 d0 01 80 9a ?.v2??b????.????a0:00 00 00 00 00 00 00 00 c3 d6 31 00 5b d7 61 00 ........??1.[?a.b0:3b 89 a7 14 00 c4 f4 ff 99 03 be cd fd ff ea 02 ;???.??.?????.??
Note the values stored at 0x8f (WHO_AM_I) and 0x90 (AV_CONF): the same we got with i2cget when we accessed 0x0f and 0x10.
i2cdump can be useful for reverse-engineering, or combined with i2c-stub-from-dump to simulate a device on a system where the target device is not available. More about this later.
It is worth mentioning that there is yet another tool, called i2ctransfer, that can be used to send multiple I2C messages as a single transfer. I have used it a couple of times for very specific devices (mainly EEPROMs) to send multiple messages at once, but I must say that the command structure is complex, impossible to remember, and the chances of messing up are not negligible. If you want to give it a try anyway, read man i2ctransfer carefully, especially the examples at the end. If your operations from userspace start getting complex, a simple program with a couple of system calls is usually more flexible, and you will know better what you are doing. Don’t worry, I will show you an example at the end of this article. Anyway, let’s run the command once. To read 2 consecutive registers (our beloved WHO_AM_I and AV_CONF), you will send a write message with the register address, followed by two read messages:
i2ctransfer -y 1 w1@0x5f 0x8f r2 0xbc 0x3f
This was achieved thanks to the auto-increment feature, and if you try the same with 0x0f, you will read 0xbc twice. In the end, the auto-increment was indeed relevant!
Now that we know how to turn our SoC into an 8-bit microcontroller, we can get back to the Linux world and use the existing driver for the hts221 instead of accessing registers directly. We can do that easily by writing the device name and its I2C address to the new_device property under the i2c-1 bus:
sudo su
echo hts221 0x5f > /sys/bus/i2c/devices/i2c-1/new_device
exit
Note that a simple sudo will fail because > is done by the shell, and not by the echo command you executed as sudo. If you fear sudo su, this is the single-command way to do the same:
Hold on, hold on! What do you mean by device name? Smart kid. Actually, you have to use the name provided in the device driver, so a match can occur. You will find it inside an i2c_device_id structure. A single driver could support different devices, and obviously you will have to use the right one for your device. Nonetheless, driver programmers always try to use an obvious name, like it’s the case here. If you take a look at the code here, you will see that the name has been “hidden”, and we have to make some (minimal) extra effort to find it:
Note for driver developers: in general, using the string directly is alright, and you will find many examples where that is done. On the other hand, HTS221_DEV_NAME is used in three different files (hts221_{core.c, i2c.c, spi.c}), so having a single source to reference the name is reasonable.
Moving on, what have we achieved with the previous command? According to i2cdetect, the address 0x5f is not accessible anymore:
UU?? Did we just brick the hts221? No, but I can tell that you did not open the man page yet (man i2cdetect). Keep calm: your device is still alive. If you fried your device somehow, you will see -- at 0x5f too. Is 0x5f not accessible anymore because the driver was loaded? Well, let’s see if we have an IIO device:
ls /sys/bus/iio/devices/
iio:device0
How do you know it is not a different device, maybe an internal sensor? Well, we can read the device name and any other information the driver supports:
pi@raspberrypi:~ $ cd /sys/bus/iio/devices/iio\:device0pi@raspberrypi:/sys/bus/iio/devices/iio:device0 $ lscurrent_timestamp_clockin_humidityrelative_oversampling_ratioin_temp_offsetin_temp_rawpowersubsystemin_humidity_oversampling_ratio_availablein_humidityrelative_rawin_temp_oversampling_ratioin_temp_scalesampling_frequencyueventin_humidityrelative_offsetin_humidityrelative_scalein_temp_oversampling_ratio_availablenamesampling_frequency_availablepi@raspberrypi:/sys/bus/iio/devices/iio:device0 $ cat namehts221
Maybe this is obvious, but just in case you are wondering: you will use the cat command to read values from properties, and the echo command to write values to properties.
We can see that this device exposes quite a few properties. We can configure some parameters like oversampling ratios and sampling frequency, and of course, measure relative humidity and temperature. Note that the measurements from IIO devices are often provided as a raw value plus an offset and a scale, and the floating-point processing of this data must be carried out in userspace.
The formula is straightforward: (raw + offset) * scale, so for a simple demonstration we can make use of a one-line bash command with some help from bc for floating-point arithmetic to get the current temperature:
That value (in °C) seems reasonable for the room I am in: it is not freezing, but I don’t feel like taking off my warm socks
3. Example with a virtual device (i2c-stub)
Why would you ever need to communicate with a device that is not there? For a number of reasons, like when you start programming a driver before the part arrives. Any other use case? I used this approach a few weeks ago to make sure that my patches to add support for the AS7311 UV sensor did not break the driver’s original target, which I did not have around. So even if you have real hardware, learning this trick can be useful in several situations.
The first step will be loading the virtual device, which will require the i2c-stub module I mentioned before. We will use the 0x5f address again, but we could use any other valid I2C address because that address is not relevant for the driver.
i2c-11?? Yet another I2C bus, now a virtual one! That makes sense, doesn’t it? We don’t want to mix real and virtual stuff. Don’t worry too much about that smbus: for us, it will be kinda I2C bus, and the command to load the driver will look like it did for i2c-1.
The probe function in the driver checks the WHO_AM_I register, so we will write the expected value accordingly to avoid errors. Again, we are using the address with auto-increment, which is the address the driver will access:
I will also write the temperature calibration I got with the dump and some random value to TEMP_OUT_L (0x2a -> + 0x80 = 0xaa), so we can check if the driver does what it should. Our last dump read 0x31 from that register, so let’s write a higher value (0xcc). Hopefully we will get a higher temperature!
In this example, we are going to use both the real and the virtual device.
If you want to be able to simulate your real device in the future in case something unexpected happens (e.g. your dog ate it, and you have to order a second one), there is a nice trick you might want to know.
I am going to make use of the i2c-stub-from-dump tool I mentioned before, so we can assign meaningful values to all registers with a single command.
First, we are going to call i2cdump and save its output:
i2cdump -r 0x80-0xbf -y 10x5f b > hts221.dump
We will not need the real device anymore: disconnect it if you like. Now we can use the file we just generated to create the virtual device:
sudo i2c-stub-from-dump 0x5f hts221.dump
64 byte values written to 11-005f
sudo bash -c "echo hts221 0x5f > /sys/bus/i2c/devices/i2c-11/new_device"
And now, the final test… can we really measure the room temperature with this virtual device?
cd /sys/bus/iio/devices/iio\:device0/
cat name
hts221echo "($(cat in_temp_raw) + $(cat in_temp_offset)) * $(cat in_temp_scale)" | bc
22.293562499
Is that not satisfying?? Of course, we are getting the value the device measured when we saved the dump, but still! Would you rather write all values in all registers one by one every time? Come on, you have to admit it was cool! No? Bah, at least I tried…
5. Last userspace bullet: ioctl(), read() and write()
If none of the tools I showed you suits the complexity of your task, and for some reason you don’t want to program a kernel driver, there is still a relatively easy solution to access your I2C device: programming your own tool. By the way, refusing to program a kernel driver does not necessarily mean that you are a noob, and it might make sense under certain circumstances. There is even this presentation at the Embedded Linux Conference about that topic. And the presenter (Chris Simmonds) is definitely not a noob.
It only took me a few minutes to code an example to validate WHO_AM_I and write 0x3f to AV_CONF, like we did before with i2cget and i2cset. I just made sure it works, so feel free to optimize it, and add complexity as required.
This simple program does the following:
Initialization: Open the I2C bus file descriptor (remember, the real device was connected to i2c-1), and provide the device address through ioctl().
Read the WHO_AM_I register. This requires a write() to set the register address, and a read() to retrieve the value.
Check that WHO_AM_I is valid. Trivial, it must be 0xbc.
Write a new value to AV_CONF. Again, a write() to set the register address is required, followed by a second write() with the new value. For simplicity, 0x3f is always written.
/****************************___hts221_i2c___****************************/#include<errno.h>
#include<fcntl.h>
#include<stdio.h>
#include<stdlib.h>
#include<string.h>
#include<unistd.h>/* i2c-specific includes */#include<linux/i2c.h>
#include<linux/i2c-dev.h>/* support for ioctl */#include<sys/ioctl.h>inthts221_i2c_init(void){constchar*i2c_bus="/dev/i2c-1";constchari2c_address=0x5f;intfd,ret;/* I2C bus file descriptor */fd=open(i2c_bus,O_RDWR);if(fd<0)returnfd;/* set slave address through ioctl I2C_SLAVE */ret=ioctl(fd,I2C_SLAVE,i2c_address);if(ret<0){close(fd);returnret;}returnfd;}inthts221_i2c_who_am_i(intfd){constcharwho_am_i_addr=0x0f;charreg;/* write address to access: WHO_AM_I = 0x0f */if(write(fd,&who_am_i_addr,sizeof(who_am_i_addr))!=sizeof(who_am_i_addr)){printf("i2c write failed: %s\n",strerror(errno));return-1;}/* operation: read 1 byte */if(read(fd,®,sizeof(reg))!=sizeof(reg)){printf("i2c read failed: %s\n",strerror(errno));return-1;}returnreg;}inthts221_i2c_av_config(intfd,charval){constcharav_config_addr=0x10;/* write address to access: AV_CONFIG has address 0x10 */if(write(fd,&av_config_addr,sizeof(av_config_addr))!=sizeof(av_config_addr)){printf("i2c write failed: %s\n",strerror(errno));return-1;}/* operation: write 1 byte (the new value for AV_CONFIG) */if(write(fd,&val,sizeof(val))!=sizeof(val)){printf("i2c write failed: %s\n",strerror(errno));return-1;}return0;}intmain(void){constcharhts221_who_am_i=0xbc;constcharhardcoded_av=0x3f;charwho_am_i;intfd;fd=hts221_i2c_init();if(fd<0){printf("i2c init failed\n");return-1;}who_am_i=hts221_i2c_who_am_i(fd);if(who_am_i!=hts221_who_am_i){printf("WHO_AM_I check failed\n");return-1;}printf("WHO_AM_I succeeded (%#01x)\n",who_am_i);if(hts221_i2c_av_config(fd,hardcoded_av)){printf("failed to update AV_CONFIG\n");return-1;}printf("%#01x was written to AV_CONFIG \n",hardcoded_av);return0;}
Don’t forget that you have to compile this program for your target, not for your host. You have to admit that you were ready to call gcc on your Intel/AMD
If your target is a Raspberry Pi or any other ARM64-based SoC, and your host has an x86 CPU:
# on the HOST:
# 1. compile:
aarch64-linux-gnu-gcc hts221_i2c.c -o hts221_i2c
# 2. copy binary to target:
scp hts221_i2c pi@raspberrypi.local:/home/pi
pi@raspberrypi.local's password:
hts221_i2c                                                  100%   69KB   1.6MB/s   00:00

# on the TARGET:
./hts221_i2c
WHO_AM_I succeeded (0xbc)
0x3f was written to AV_CONFIG

# trivia: command to check the file type?
file hts221_i2c
hts221_i2c: ELF 64-bit LSB pie executable, ARM aarch64, version 1 (SYSV), dynamically linked, interpreter /lib/ld-linux-aarch64.so.1, BuildID[sha1]=e7fff0755ff8f6698207ae07b58681ee81cdda61, for GNU/Linux 3.7.0, not stripped
I failed to write a short article, but at least I showed you quite a few tricks, didn’t I? If you make use of half of them, I am pretty sure that you will always keep I2C devices under control.
 For now, you just want your Raspberry Pi to “enable” I2C. You can do it easily with