Fixing bugs is seldom an appealing task for a developer, especially if you have no idea why they happen, or even worse, if you are not able to reproduce them consistently.
But fixing bugs when exhaustive reports and means to reproduce them are provided is a whole different story. Let alone if your fixes might turn into major contributions to the Linux kernel stability. That sounds much better, doesn’t it?
If you are still not convinced, imagine yourself introducing a bug into the kernel when adding new code, a bug that testing tools are reporting hundreds of times (sometimes even thousands), and not having the tools to fix it. I bet you are not willing to go through such a frightening situation. If you ever blunder so bad, you probably want to be ready to fix the bug immediately, which means having the right tools, and knowing how to use them.
In this (long) article I will show you how to use the reports from Syzbot/Syzkaller to fix kernel bugs with some support from Qemu and GDB. I will also go through a real example where I fixed a bug in a device driver (the bulk of this article) to illustrate the whole process and important aspects you should consider when fixing bugs and sending fixes upstream. Fixing a kernel bug can be a daunting endeavor for a beginner, so I tried to break it down to simple steps. I hope that after reading this, you will feel confident to fly solo.
Content:
- Syzkaller/Syzbot
- Basic setup
- Walkthrough with a real bug
- Choosing a bug to fix
- Follow-up: fixing the fix
1. Syzkaller/Syzbot
As I mentioned in my first article about how to become a Linux kernel contributor, bugs found through dynamic analysis (fuzzing) are usually more critical than bugs found through static analysis: they might only happen with specific configurations, under certain timing constraints, or if several processes attempt to access shared resources at the same time. Such cases are not easy to foresee while programming, especially when you are working on a project that runs on many architectures and is highly configurable (e.g. the Linx kernel), and your tests/code checks could miss them easily. Don’t get me wrong, static analysis is very important and I am always looking for new tools to minimize the risk of submitting code with those kinds of errors. Actually, static analysis and tools available could be the topic for another article…
Let’s get back to fuzzing. In a nutshell, fuzzing the kernel is nothing more than running it with different configurations and checking if it crashes at some point under certain circumstances (initialization, interactions among kernel processes, system calls, etc.). Probably the most powerful tool for the job is Syzkaller (apparently the name comes from system call fuzzer, its core functionality), which on top of fuzzing the Linux kernel (its original purpose, nowadays more kernels are supported), it generates reports from the bugs it finds, and sometimes even reproducers (programs that can be used to trigger the bugs).
Everyone can install Syzkaller and fuzz the kernel, which at some point might be a wise decision. But here I am going to make use of Syzbot, which is a higher-level tool that continuously build kernels with different configurations on a number of architectures and deploys Syzkaller instances to test them. The beauty of that is that it deduplicate bugs, reports them to a dedicated website, and keeps track of their status. We only have to visit that website, check for open bugs, and see if we can fix some of them that caught our attention. And that is exactly what we are going to do once we have installed a couple of useful tools.
2. Basic setup
I guess you don’t want to crash the kernel running on your computer, and then see if you can fix it. Running the kernel on a virtual machine is by far a more convenient approach, and qemu is going to help us with that. Then we are going to use GDB to debug, so this is a great opportunity to overcome your fears, and learn how to use that amazing tool in a controlled environment. If you learn how to use qemu and gdb properly, you will have the opportunity to use them consistently every time you need to debug the kernel (if no hardware or the real target is required, where KGDB might be what you are looking for).
Note that there is a specific version of qemu for every architecture, and it will expect a kernel and a root file system built for that architecture, which indeed will require us to install the right compiler for the architecture.
I am not going to show you how to install qemu for every architecture or build the rootfs, because Syzkaller has documented that very well for all the supported architectures, and that documentation is more likely to stay up-to-date than this article. You can check here the different options you have.
I have followed the steps for x86-64, arm64 and riscv64 successfully, and everything works as expected on my Ubuntu machine. As we will see later, we will end up having a proper Debian distro with a custom kernel. If you want to follow the walkthrough, I will be using the x86-64 setup. You don’t even need to follow all steps, so make sure that you carry out the following tasks:
- Install Prerequisites.
- Create an Image, first installing debootstrap and then running the provided script
create-image.sh, optionally with the –distribution to get the last version (default is Bullseye, I chose trixie). - Install Qemu.
You will not require the “Kernel” and “syzkaller” sections, though; we will rely on Syzbot instead.
Are you allergic to official documentation? Okay, let me introduce Ricardo B. Marliere’s personal page, and especially this article where he will show you step by step how to install and configure the tools we are going to use for x86_64 on Debian-based hosts, while mentioning some tricks to optimize your workflow. Ricardo graduated with me from the LKMP last year, is a curious guy, and his articles are always very interesting. Just check them out!
3. Walkthrough with a real bug
In this section we are going to analyze a real bug tracked by Syzbot, fix it, and test our fix before we send it upstream. I picked a very simple bug that I have already fixed, and got accepted upstream, so we can take a look at the whole process. To make things a bit more interesting, we are going to build the kernel with Clang/LLVM, which will allow us to profit from a nice tool like KMSAN (not supported by gcc at the moment of writing).
You could still build the kernel with gcc and everything would work fine, but it will not crash if uninitialized variables are used, which is what we are going to fix here. On the other hand, KMSAN slows down the kernel (don’t enable it for production!), and because in this case the kernel will not crash without KMSAN, you will be able to debug from the beginning much faster. Bottom line: learn how to build the kernel with both gcc and llvm.
To install clang and llvm on Debian-based distros, a simple sudo apt install clang llvm will be enough. Clang is a very useful tool for other purposes like code formatting, so I would install it anyway.
(Upd. 10/09/2024) Before you continue: This example has been tested with positive results by several mentees from the LKMP, and I have gone through it multiple times to help complete beginners. If you are not able to make it work, please double check every step, because it works. On the other hand, if you use a different kernel configuration, qemu arguments, or whatever that differs from this example, you will have to find out why it does not work anymore, and eventually fix the issue. This is (obviously) just an example, not (even more obviously) an universal solution.
3.1. Accessing bug reports
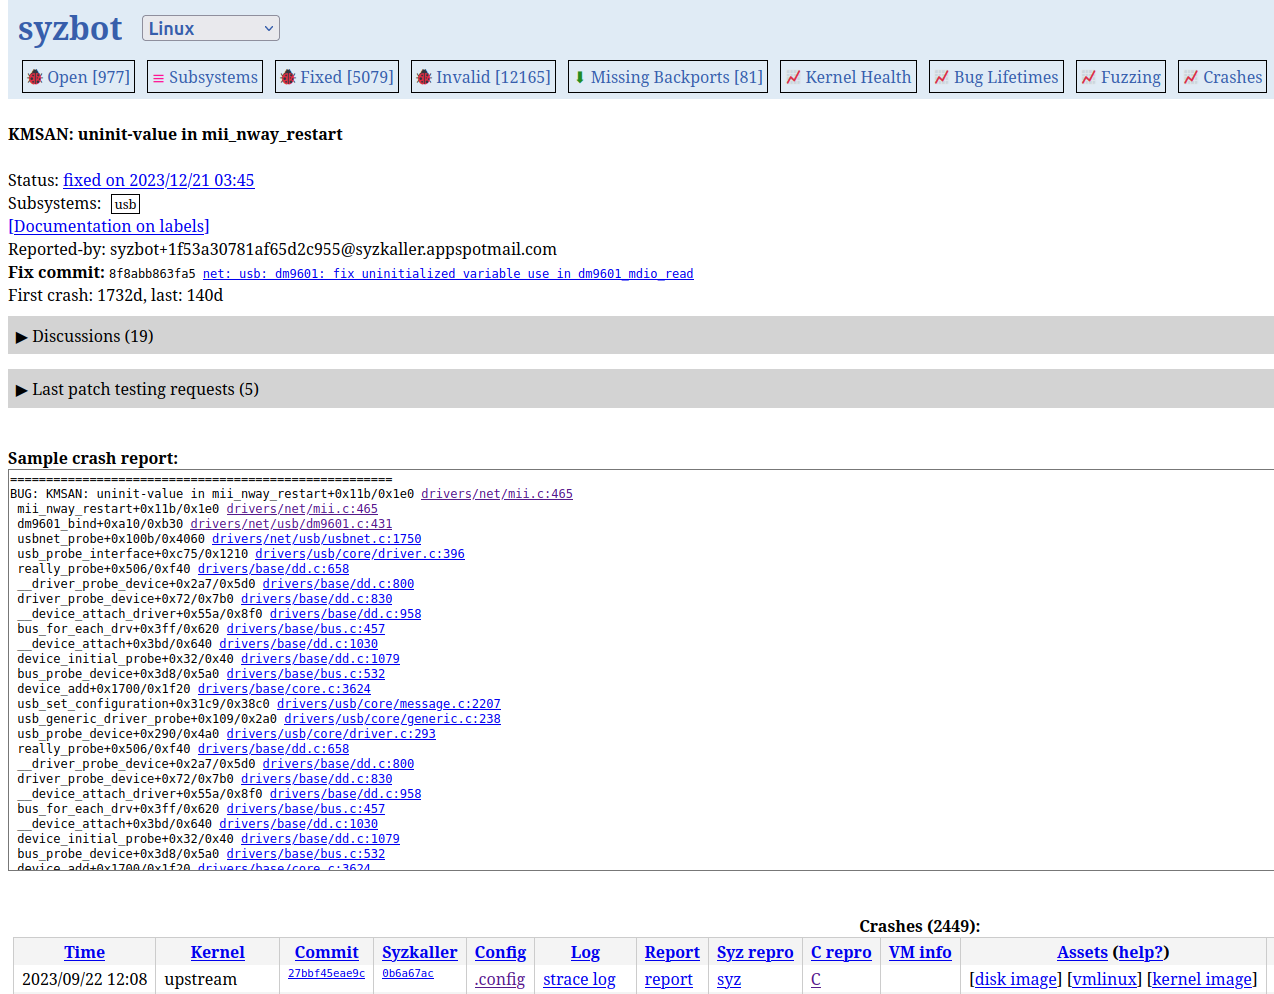
The Syzbot site may not look fancy, but it runs like clockwork and provides loads of information. Actually it provides much more information than we need here, so we are only going to focus on the first to tabs: Open (bugs) and Subsystems. The first one (which is the default) shows the instances under test. Right below you will find a section called open, where all bugs that have not been fixed are listed, and some basic statistics about them are provided. You can click on any of them to go to its dedicated page, where you will find loads of information about that specific bug.
If you click on the Subsystems tab, you will find the same list of open bugs divided into subsystems. You probably have a preferred subsystem, either because you already know something about it, or because you want to learn what it does. Either way, fixing bugs from a particular subsystem will help you learn its internals. In my case, I chose ‘Input’ and ‘USB’ because I knew them superficially, and I wanted to get a bit deeper. Feel free to choose any other subsystem you like; the bug reports always look very similar and provide the same sections, so what you are going to learn here can be applied to any Syzkaller bug.
We are going to work on this bug, which everyone should be able to grasp and eventually fix. If you scroll down to the Crashes section, you will find a list with all the occasions where the bug was triggered, the kernel, head commit and config file used to trigger it, logs, and in this case, even reproducers to automatically trigger the bug on demand. We only have to focus on finding a fix for the bug, which indeed is more easily said than done ![]()
3.2. Understanding the reports: no magic required
Jumping into a debug session with GDB (or any other debugger) without knowing what you are looking for is not a good idea. Using the logs and crash reports to gain an insight into why there is a bug, and where it might be, is much wiser and you will save a lot of time. Often you will not need any debugger at all, because you will find the solution on your own.
First things first: what kind of bug are we going to analyze? The title is screaming to us: KMSAN: uninit-value in mii_nway_restart. Alright, some variable is being used without proper initialization in a function called mii_nway_restart.
Scroll down to Sample crash report and click on the name of the function. This is what you will see:
/**
 * mii_nway_restart - restart NWay (autonegotiation) for this interface
 * @mii: the MII interface
 *
 * Returns 0 on success, negative on error.
 */
int mii_nway_restart (struct mii_if_info *mii)
{
	int bmcr;
	int r = -EINVAL;

	/* if autoneg is off, it's an error */
	bmcr = mii->mdio_read(mii->dev, mii->phy_id, MII_BMCR);

	if (bmcr & BMCR_ANENABLE) {
		bmcr |= BMCR_ANRESTART;
		mii->mdio_write(mii->dev, mii->phy_id, MII_BMCR, bmcr);
		r = 0;
	}

	return r;
}
At first glance the local variables look alright because they have been initialized before being used. Maybe the function is receiving an uninitialized parameter!
There must be a call to this function somewhere, and we might find the bug there… or not. You can jump to the previous function from the crash report (dm9601_bind), which is part of a device driver (this USB to Ethernet MAC controller) and see that the code is not as trivial as the previous one. Nevertheless, it seems that the argument passed to mii_nway_restart (mii) has been initialized:
dev->mii.dev = dev->net;
dev->mii.mdio_read = dm9601_mdio_read;
dev->mii.mdio_write = dm9601_mdio_write;
dev->mii.phy_id_mask = 0x1f;
dev->mii.reg_num_mask = 0x1f;
Could any of those assignments be wrong? In principle, yes e.g. if dev->net is uninitialized. But as we can see, dev->net is used several times in the function, so I would not bet that mii is causing any trouble. Difficult to say without deeper analysis, though. Don’t worry, we are not going to analyze any deeper.
I know, I know… analyzing plain code and logs is less cool than setting conditional breakpoints and reading the content of variables during execution. And you want to mention in your resume that you know how to debug the kernel with (K)GDB, not that you know how to interpret crash reports (although it is way, way more important), so let’s continue.
Spoiler alert: if we had been more patient instead of rushing at gdb, we would have found the function where the variable was created at the bottom of the crash report:
Local variable res created at:
 dm9601_mdio_read+0x3d/0xd0 drivers/net/usb/dm9601.c:226
 mii_nway_restart+0x88/0x1e0 drivers/net/mii.c:463
3.3. Building the kernel
Our previous analysis did not suffice, so let’s get some useful stuff from the last time the bug was found to build the kernel:
- Go to the kernel repo and check out the commit with hash 27bbf45eae9c
$ git checkout 27bbf45eae9c

Updating files: 100% (21315/21315), done.
Previous HEAD position was b401b621758e Linux 6.8-rc5
HEAD is now at 27bbf45eae9c Merge tag 'net-6.6-rc3' of git://git.kernel.org/pub/scm/linux/kernel/git/netdev/net
- Download the .config file and build the kernel for the target architecture (x86_64 as stated at the beginning of the config file). You can use
wgetwith the URL of the .config link:
$ wget "https://syzkaller.appspot.com/text?tag=KernelConfig&x=6f1a4029b69273f3" -O .config

--2024-02-23 20:47:54--  https://syzkaller.appspot.com/text?tag=KernelConfig&x=6f1a4029b69273f3
Resolving syzkaller.appspot.com (syzkaller.appspot.com)... 2a00:1450:4016:808::2014, 142.251.36.180
Connecting to syzkaller.appspot.com (syzkaller.appspot.com)|2a00:1450:4016:808::2014|:443... connected.
HTTP request sent, awaiting response... 200 OK
Length: 238909 (233K) [text/plain]
Saving to: ‘.config’
.config               100%[=======================>] 233,31K   613KB/s    in 0,4s
2024-02-23 20:47:55 (613 KB/s) - ‘.config’ saved [238909/238909]

# Note that we are building with LLVM, not GCC!

$ make LLVM=1 -j$(nproc)
Note: you don’t need to build the kernel to reproduce a Syzkaller bug. Instead, you can download the vmlinux and bzImage files (even a disk image is available) from the Assets column in the Crashes section. But if you want to test fixes, you will have to modify the code and build the kernel anyway.
3.4. GDB (very) basic usage
Some people fear gdb because it looks like a menacing console where a bunch of commands must be memorized to accomplish simple actions. Just use the help command to overcome your fears. If you are too terrified to type anything on the console, look for frontends to gdb or plugins for your favorite IDE. I don’t use vscode or Eclipse, but I know they have an interface to gdb. You can also call gdb with the tui argument to get a (decades ago) fancy user interface.
If you are brave enough to give plain gdb a try, you will be able to accomplish most of the debugging with a few simple commands:
- continue (c): continue execution.
- step (s): execute one line of code (will step into functions).
- next (n): execute entire function without stepping in.
- breakpoint (b): to set a breakpoint, conditional or unconditional, giving a function name or a specific code line.
- info variables/locals/args: to print values of all globals/locals/arguments.
- print (p) “variable_name”: to print the value of a single variable.
- backtrace (bt): to print the backtrace.
- exit: to exit gdb.
These commands will be more than enough to fix the bug. But as you can imagine, gdb has way more to offer. There are like a thousand of good tutorials out there as well as official documentation, so I will skip an extra article for gdb. Anyway, what we just saw is enough to go on.
3.5. Debugging with Qemu and GDB
We are ready to run qemu with the kernel we just built and the rootfs you should have generated with the create-image.sh script from Syzkaller. I am just copying the command from the documentation with the paths to the locations of the kernel and rootfs on my computer, adding the -s parameter to start gdbserver, so we can connect to it. How do I know that? From the man page: -s Shorthand for -gdb tcp::1234, i.e. open a gdbserver on TCP port 1234.
$ qemu-system-x86_64 \
        -m 2G \
        -smp 2 \
        -kernel "$HOME/linux/arch/x86/boot/bzImage" \
        -append "root=/dev/sda console=ttyS0 earlyprintk=serial net.ifnames=0" \
        -drive file="$HOME/syzkaller/trixie.img",format=raw \
        -net user,host=10.0.2.10,hostfwd=tcp::10021-:22 \
        -net nic,model=e1000 \
        -enable-kvm \
        -nographic \
        -s

# The VM starts booting...

Debian GNU/Linux trixie/sid syzkaller ttyS0

syzkaller login: root
Linux syzkaller 6.6.0-rc2-00244-g27bbf45eae9c #73 SMP PREEMPT_DYNAMIC Fri Feb 23 21:11:07 CET 2024 x86_64

The programs included with the Debian GNU/Linux system are free software;
the exact distribution terms for each program are described in the
individual files in /usr/share/doc/*/copyright.

Debian GNU/Linux comes with ABSOLUTELY NO WARRANTY, to the extent
permitted by applicable law.
Last login: Fri Feb 23 20:15:36 UTC 2024 on ttyS0
root@syzkaller:~#
Now we are ready to download the C reproducer and copy it to the VM with scp (using the rsa id create-image.sh generated). You could also install wget on the VM exactly like you would do on your host and run the command normally, with no need for scp. No surprises, the result will be the same.
$ wget "https://syzkaller.appspot.com/text?tag=ReproC&x=1753d0ec680000" -O repro.c
--2024-02-23 20:57:51--  https://syzkaller.appspot.com/text?tag=ReproC&x=1753d0ec680000
Resolving syzkaller.appspot.com (syzkaller.appspot.com)... 2a00:1450:4016:80a::2014, 142.251.36.244
Connecting to syzkaller.appspot.com (syzkaller.appspot.com)|2a00:1450:4016:80a::2014|:443... connected.
HTTP request sent, awaiting response... 200 OK
Length: 25593 (25K) [text/plain]
Saving to: ‘repro.c’

repro.c               100%[=======================>]  24,99K  --.-KB/s    in 0,03s

2024-02-23 20:57:52 (833 KB/s) - ‘repro.c’ saved [25593/25593]

$ scp -i "$HOME/syzkaller/trixie.id_rsa" -P 10021 repro.c root@localhost:~/

# On the VM:

root@syzkaller:~# ls
repro.c
root@syzkaller:~# gcc -o repro repro.c
root@syzkaller:~# ls
repro  repro.c
Now we can open a second terminal (terminal emulators like terminator are handy), start GDB and connect it to the gdbserver on the VM (the target remote :1234). We will provide the vmlinux file generated with the kernel build, which includes debug symbols (because CONFIG_DEBUG_INFO was selected in the config file; file vmlinux will confirm that debug info is included):
$ gdb -tui -ex "target remote :1234" "$HOME/linux/vmlinux"
Then gdb will start and connect to gdbserver, freezing the VM. At that moment, we can set a breakpoint at the beginning of the dm9601_bind function we saw before (the entry point to the driver code). We can ‘c’ontinue and the VM will run again.
(gdb) b dm9601_bind
Breakpoint 1 at 0xffffffff88b5d773: file drivers/net/usb/dm9601.c, line 355.
(gdb) c
Continuing.
We are ready to run the reproducer on the VM:
root@syzkaller:~# ./repro
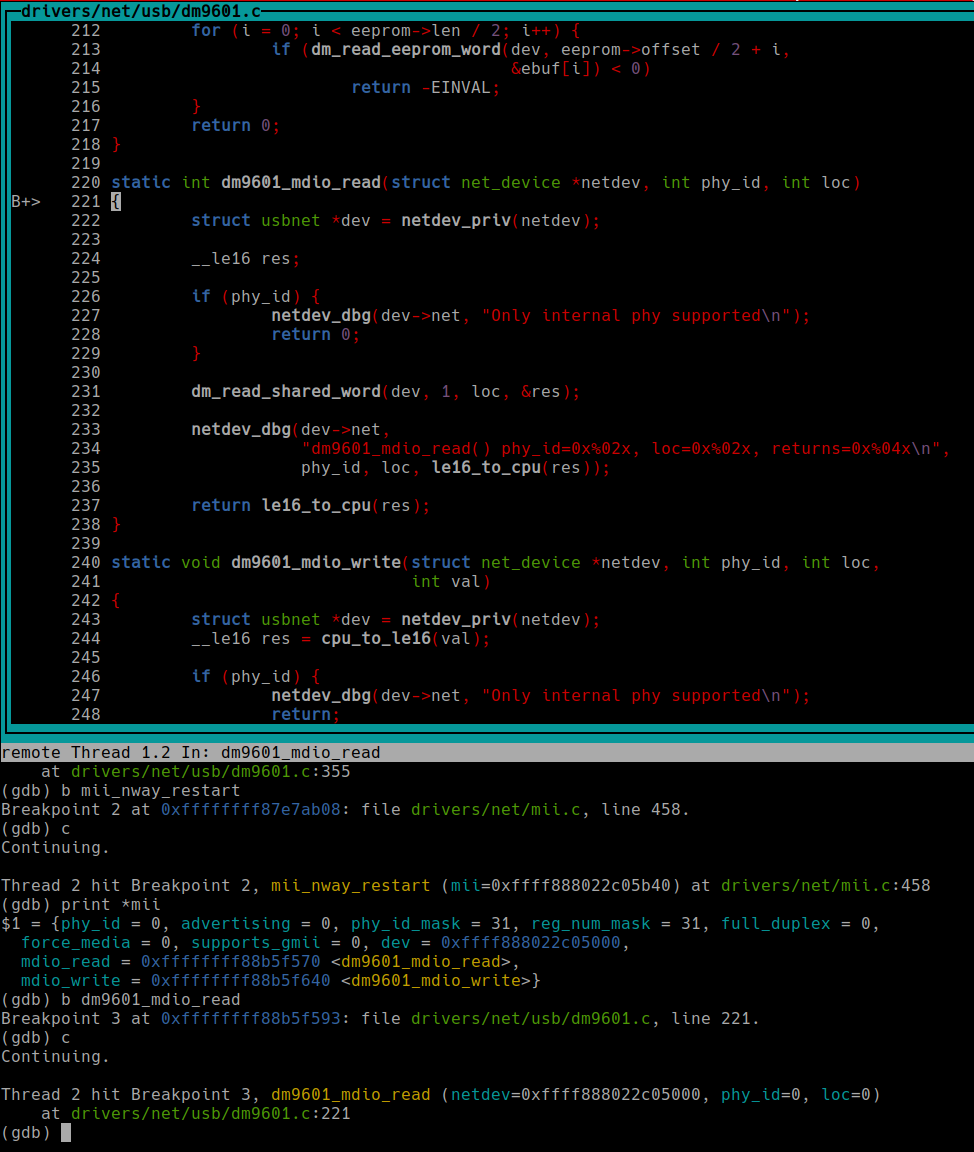
We have already seen in the code that mii was properly initialized, but we can make sure we didn’t miss anything by printing the variable. Everything looks fine, so let’s set a second breakpoint at the beginning of mii_nway_restart, so we don’t have to step through the whole function:
(gdb) b mii_nway_restart
Breakpoint 1 at 0xffffffff87e7ab08: file drivers/net/mii.c, line 458.
(gdb) c
We have reached the critical function (according to the report). If we print *mii, we will see that everything looks fine, and its mdio_read member, a function pointer, points to dm9601_read (one of the assignments we saw when mii was initialized). The r variable is obviously initialized, but bmcr… what if the returned value of dm9601_mdio_read is uninitialized? We will be using an uninitialized value! That looks promising, so let’s jump into dm9601_mdio_read:
This function returns the res variable, which is passed to dm_read_shared_word. That function must assign a value…
The res variable is now value, which is passed to dm_read to finally assign a value… but only if the code reaches dm_read! As you can see, there is an error check for dm_read_reg before. If that function fails, the program will jump to out without assigning any value to value! And *value is res, which will become bmcr. And when bmcr is used in mii_nway_restart… uninitialized value!
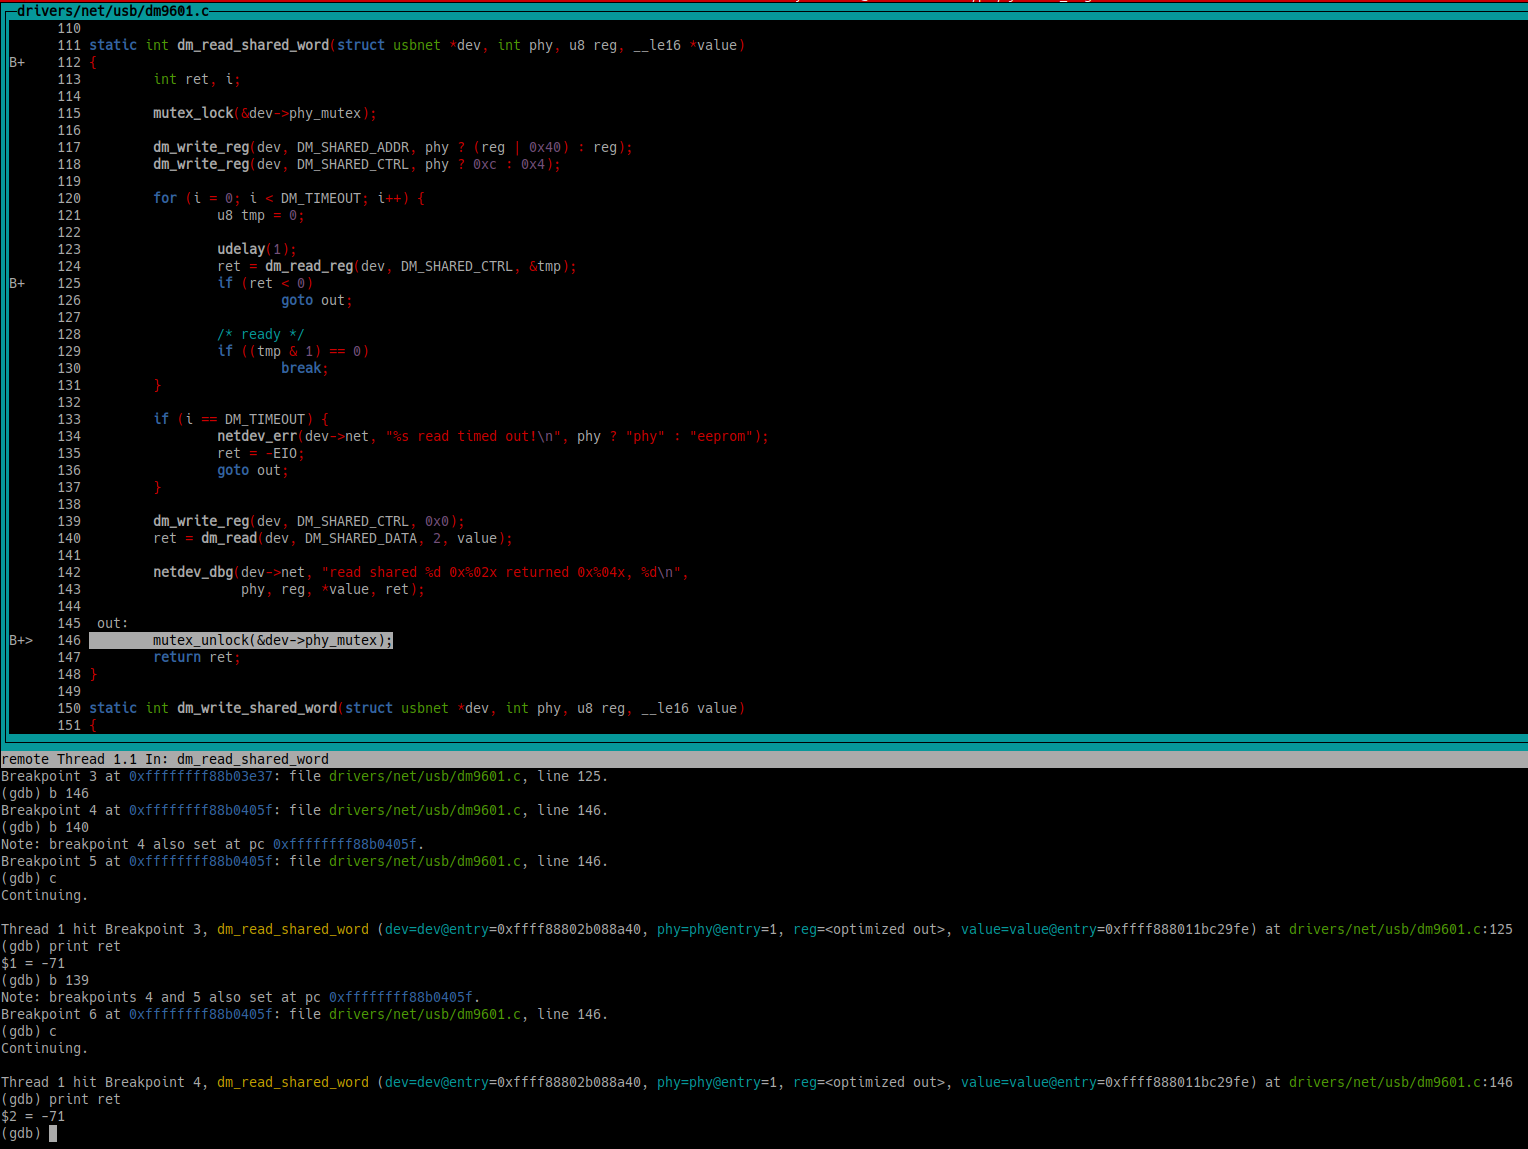
If you step through the code, you will see that that is exactly the case: dm_read_reg is returning an error code, and everything goes to hell. Finally, if you let the program run further, the kernel will crash (if you compiled it with LLVM and KMSAN was selected), like it did when syzkaller tested it.
Note: if you pass a vmlinx with debug symbols to gdb, but still get errors when accessing memory addresses, check if KASLR is enabled. In that case, you can pass the -append nokaslr argument to Qemu.
3.6. Fixing the bug
There are several ways to avoid that the variable stays uninitialized. For example, you could do something like *value = -EINVAL if dm_read_reg fails. But why would you need any value? If the function fails, the value of the variable should be irrelevant, and processing it would be a waste of time and resources. Hence why dm_read_shared_word returns an error code, which the caller should check. That is a very common pattern that you will find in functions that get arguments passed as references: if it fails and returns an error code, the argument is ignored, and the error is handled. But in this case, dm9601_mdio_read does not check anything. Instead, it sends res to the caller, no matter what.
The bug can be easily fixed by propagating the error codes. An error message is not mandatory (often not desired!), but as we will see, it ended up being more useful than expected. The diff should look more or less like this:
static int dm9601_mdio_read(struct net_device *netdev, int phy_id, int loc)
{
	struct usbnet *dev = netdev_priv(netdev);

	__le16 res;
+	int err;

	if (phy_id) {
		netdev_dbg(dev->net, "Only internal phy supported\n");
		return 0;
	}

-	dm_read_shared_word(dev, 1, loc, &res);
+	err = dm_read_shared_word(dev, 1, loc, &res);
+	if (err < 0) {
+		netdev_err(dev->net, "MDIO read error: %d\n", err);
+		return err;
+	}

	netdev_dbg(dev->net,
		   "dm9601_mdio_read() phy_id=0x%02x, loc=0x%02x, returns=0x%04x\n",
		   phy_id, loc, le16_to_cpu(res));

	return le16_to_cpu(res);
}
Then the caller (mii_nway_restart) will check the return value, and so on. Because mii_nway_restart will handle the error, right? That is library code, it has to handle error codes properly! It even sets the initial error code (r = -EINVAL). I mean… it is doing some kind of implicit error handling, isn’t it? There is an AND operation between bmcr and BMCR_ANENABLE (0x1000), and if the bit is not set, r = -EINVAL is returned!! Nah, all bullsh*t. More about it later.
3.7. Testing the fix with Syzbot
Once we have patched the code, we can re-compile, run qemu again, and this time the kernel should not crash. That is a good indicator, but it does not mean that we found the best solution, or even a valid solution at all. What if our setup is not 100% identical to the one used by Syzkaller? There is an easy solution for that: we can ask Syzbot to apply our patch, and test the same kernel under the same circumstances once again. That will only work if the report provides a Syz repro, which is the case for the bug we are analyzing.
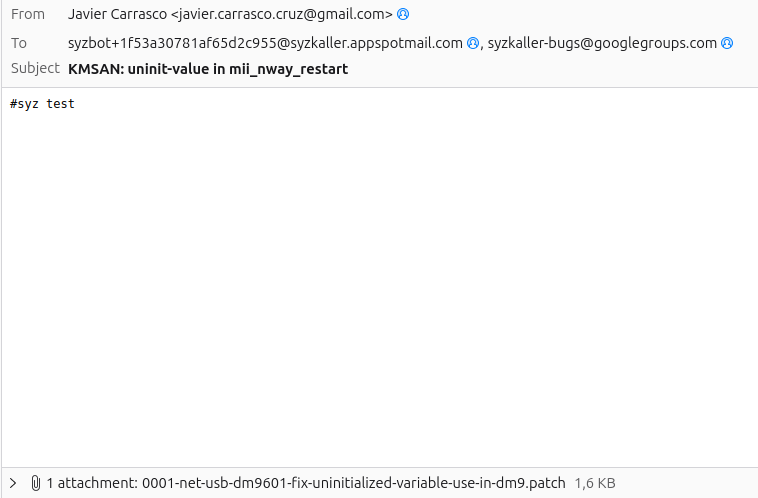
In order to trigger a new test, we can send our patch per email to the address provided at the beginning of the report:
Reported-by: syzbot+1f53a30781af65d2c955@syzkaller.appspotmail.com
You should also add syzkaller-bugs@googlegroups.com to the Cc list for tracking purposes. If you don’t, you will receive the following gentle reply:
Your commands are accepted, but please keep syzkaller-bugs@googlegroups.com mailing list in CC next time. It serves as a history of what happened with each bug report. Thank you.
What should the email contain? It is well documented here, but basically you have to send the #syz test command and the patch, either attached to the email or simply pasted under #syz test.
Your email will trigger a Syzkaller instance that will confirm (or not) that the bug can’t be reproduced, which still does not mean that it is solved. You will receive an email with the result, and your patch will be added to the Last patch testing requests section, making it publicly accessible.
The next step will involve reviewers and maintainers who have some expertise, and might suggest improvements to the fix.
3.8. Sending the fix upstream
I don’t need to tell you how to send patches upstream, because you have already read my third article about how to become a Linux kernel contributor. Nevertheless, there are a few aspects worth mentioning:
-
Your commit description should address why there is a bug, and why your solution fixes it. No magic solutions out of nowhere; no additional workload for the reviewers trying to understand cryptic patches.
-
Don’t forget to add the Reported-by:, Fixes: and Closes: tags as stated in the official documentation. You have already seen the Reported-by: the email address to test the patch. Fixes: requires you to identify when the bug was introduced. Usually you can easily find out with git blame and your understanding of the bug. If you tested the patch with Syzbot, and the issue could not be reproduced, you will receive a notification with at Reported-and-tested-by: tag that you can add instead the simple Reported-by:. Closes: is an easy one, which only requires the URL of the bug report.
-
Add the email address you used to send patches to Syzbot to the Cc for tracking purposes. Note that the bug report includes a Discussions section, where public discussions about the bug are tracked.
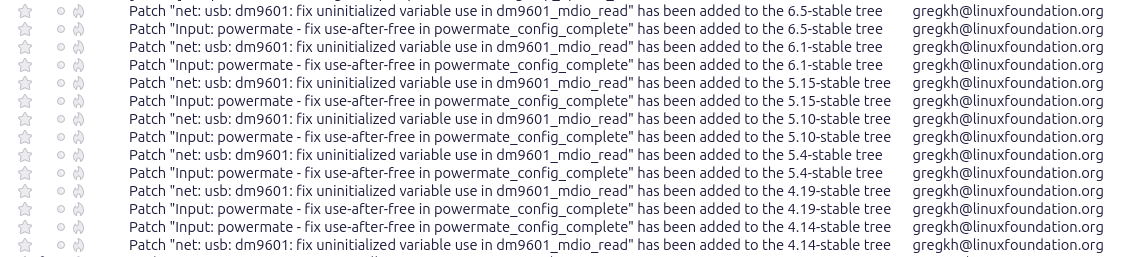
Then the submission process will continue like with any other patches. But if the patch gets applied to the mainline kernel, it will be probably be ported to all stable kernels affected by the same bug. If that is the case, you might get a bunch of emails from Greg Kroah-Hartman (the maintainer of the stable kernels) to notify that the patch was applied to the stable kernels that need the fix.
4. Choosing a bug to fix
If you simply want to learn the basics, or you still don’t feel confident enough when using the tools I showed you, I would recommend you to pick an “easy” bug for your first attempt:
-
One you understand: if you don’t even understand the title, skip that one.
-
Relatively new: there must be a reason why a bug has been around for a year.
-
With reproducers and rich reports: they make life easier.
Bugs where multiple threads are involved, that only arise once in a blue moon, with no reproducers, and from an architecture you don’t know aren’t probably what you are looking for. Don’t torture yourself like that, at least until you get used to the workflow and gain some experience with simpler bugs.
And last, but not least, especially if you never worked with Syzbot: make sure that you don’t pick a bug that has already been solved. Check if patches have been sent to be tested, as well as discussions in the mailing lists where it is involved. Save precious time and energy for a bug no one is working on!
5. Follow-up: fixing the fix
Even though the patch we saw solved the use of an uninitialized variable and it was accepted upstream, it was not completely correct. Why? Because I assumed that I could simply propagate the error codes and expect that the users of dm9601_mdio_read would not ignore the error. But that assumption is wrong for the MII library, which does not check return values in many occasions. Sending an error code in such cases might lead to unexpected behavior, like in our case where mii_nway_restart checked if a flag was set. Given that errors are often negative integers, many “flags” will be set. As we don’t know what error code will show up every time, we can more or less end up being in the same situation as using uninitialized values. Even worse, because now there is no crash!
Is that a clean implementation? Most probably not, but it has been around rather long and many of the consumers have adapted their code to return 0 instead of the error code, expecting that an empty value is not the desired outcome. Therefore, fixing the consumer is easier and less error-prone. The fix is as simple as returning 0 on error, and hence why the error message ended up being more useful than expected. Fortunately, I found the bug myself before it was reported by an affected user, and my second fix was applied without major issues. If you take a look at the discussion, you will notice that I was not the only one who found the pattern followed in mii.c odd. Apparently, mii.c is unmaintained, which could explain why the error handling is like it is.
Anyway, this was a valuable lesson for me: common patterns are NOT universal patterns, which is especially true for old code. Testing the fixes more thoroughly, beyond the point where the original bug occurs, and looking for unintended consequences is always worth it. And I hope that this will also teach an important lesson for newcomers to open source: be honest, humble and open to assume your own mistakes. You will eventually mess up, and the more you contribute, the more often you will mess up. There is no reason to hide your mistakes; instead, work on a better solution and make it public, so everyone can profit from it. That is what FLOSS is all about.
Enjoy and share knowledge!